

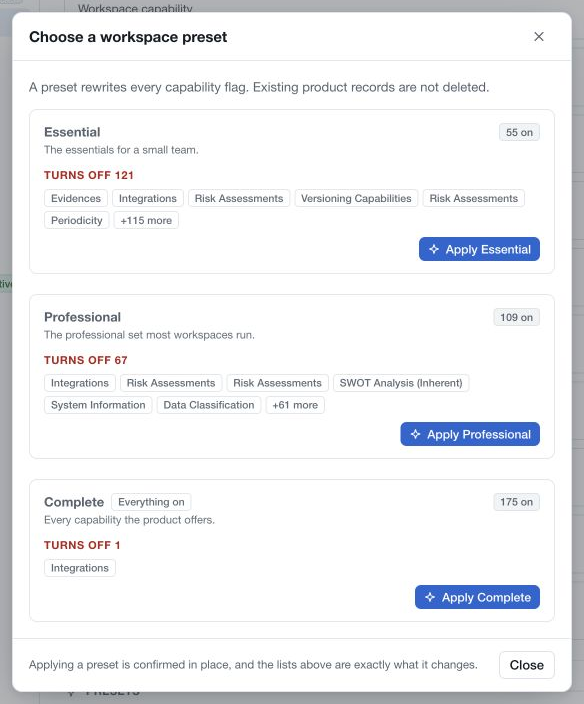
Framing presets provide starting selections of workspace capabilities. Open Settings → Framing, then Compare presets. The current presets are Essential, Professional and Complete.
Review the actual selection
Select a preset to inspect its enabled capabilities and the changes it would make to your current configuration. Pay attention to both the options being enabled and those being turned off.
Use the detailed selection and difference list when deciding whether a preset fits. A preset name is not a guarantee that every available flag will be enabled. Counts also depend on the capabilities available in the workspace.
Essential can serve a narrower starting scope; Professional and Complete provide broader selections. Choose based on the work your team will perform, then review the exact configuration shown in the preview.
Apply deliberately
- Confirm the active workspace and open the preset comparison.
- Select a candidate and review the proposed differences.
- Resolve any unexpected changes before applying it.
- Use the preset's apply confirmation when ready.
- Verify the resulting switches and the affected navigation or module.
Applying a preset replaces the current framing selection with that preset's configuration. It can therefore change earlier manual tailoring. The result affects the workspace immediately; it is not a private preference.
You can fine-tune individual capabilities afterward. Turning capabilities off does not delete their stored data, and turning them on does not grant new role permissions or complete their supporting setup.
Review framing again when your programme expands or responsibilities change. The number of enabled capabilities is a configuration count, not a maturity or compliance score.